This guide tells you how to pass data to and from the UKMARSBOT using a serial link to a PC. There are 2 serial connections available on the robot, one using the USB cable and one using a serial link which could be either a physical cable or a Bluetooth wireless connection.
- Using the USB cable
In the Arduino Sketch program you can send data to a PC application. The simplest PC application is the serial monitor in the Arduino IDE, which displays the information sent on a window on your PC screen. It can also send information from the PC to the Arduino. At the default speed of 9600 bits / second you can send about 950 bytes of data per second. However if you change the default speed in the Arduino sketch and in the serial monitor application to match you can get much faster speeds.
The major drawback of using this method is that you are likely to want to send data while the robot is moving, but it will be constrained by the USB cable. - Using The serial connector on the robot with Bluetooth
This has the advantage of being wireless so you can talk to your robot and collect data from it while it is on the move.
You will need a Bluetooth module and a PC with Bluetooth connectivity or a Bluetooth dongle for it. On Ebay if you search for HC05 you should find a number of suitable items looking similar to this:
Front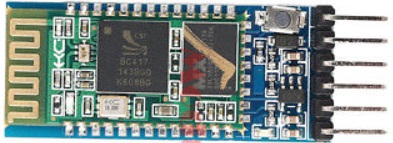
 Back
Back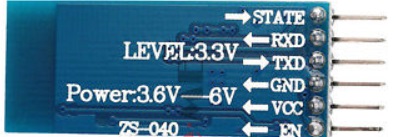
You may see something called a JDY-30 or a JDY-31 which are the latest versions of this.
This module normally has 6 pins, but we only need to connect the middle 4 pins to the Serial socket on the robot. - If you are using the original main board it is a bit more complicated because we need to change the order of the pins and to level shift the voltage on the transmit pin from 5 volts as put out by the Arduino to 3.3volts are required by the HC05 equivalent device. However, if you are using the later v1 main board these extra components are already on the board so you can skip straight to step 4.
To do this you need make a small interfacing board with stripboard or perf-board which has a 6 pin socket at on end and a 4 pin pin-header at the other end with the following connections:
Firstly ignore the key and state pins (the 2 outside ones) on the HC05.
VCC on the HC05 connect to the 5V end pin on the pin header.
Ground on the HC05 connects to Gnd third pin on the pin header.
TX on the HCO5 connects to the RX 2nd pin on the pin header.
RX on the HC05 connects to the junction of 2 resistors one of which (1K ohm) goes to TX the 1st pin on the pin header and the other resistor (2k ohms) goes to ground.

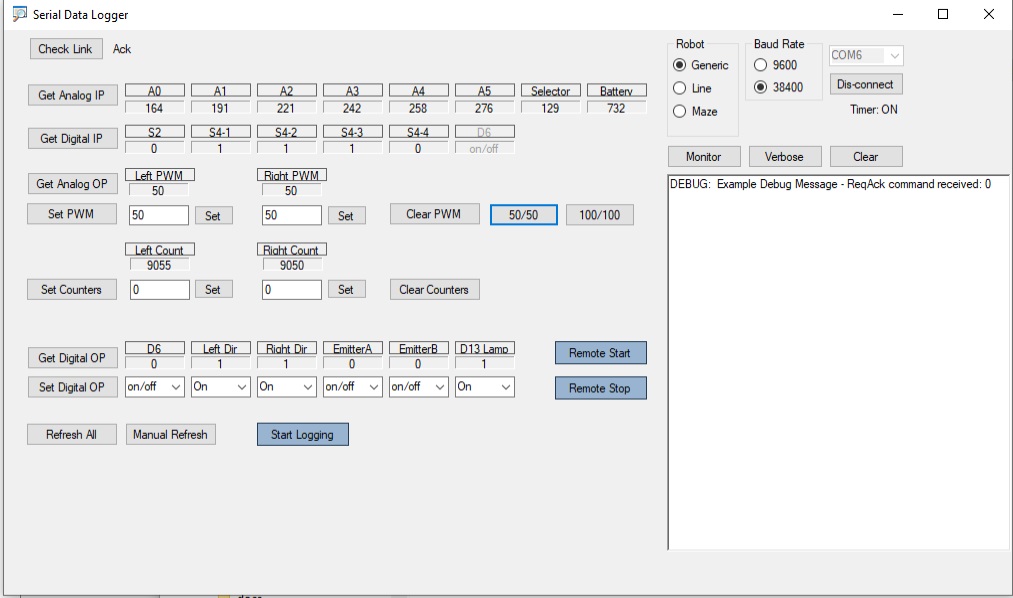
4. Having connected the interface board and connected it to the robot (if using the original main board) and plugged in the HC05 the right way round so that the 5V and ground pins match up, you need to pair it with your PC using the Bluetooth connection settings program on your PC. Then you need to connect to it from the PC using a comms app which could be a terminal emulator like PUTTY or you can use the PC app from UKMARSBOT Github as shown below, which allows you to monitor all the analogue and digital inputs set the motor speeds and read the wheel counters if you have encoders fitted.
Please note that some cheap HC05 or equivalent modules are a bit tricky to get going and may need AT commands issued to them to set the correct speeds or other parameters. Look at the documentation that comes with the module or on the internet if you have problems.
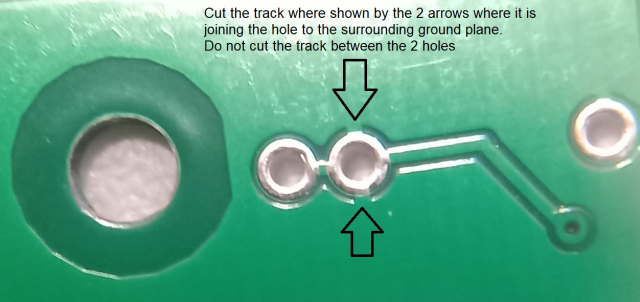
Important – if you are using the board labelled UKMARSBOT 20210924 there is a minor fault that can be easily corrected. On the bottom of the board where R10 meets R11 the via for the R10 lead is also connected to ground at each side of the pin. Use a sharp knife to cut the ground connection at each side of the connection, leaving the connection between R10 and R11.