
For use with their micro metal gear motors, Pololu supply a magnetic encoder kit. The kit provides a reliable quadrature pulse train that gives up to 12 counts per rotation of the motor armature. For greater resolution, you can make a new magnetic disc to get up to 36 counts per rotation.
Pololu Magnetic Encoder
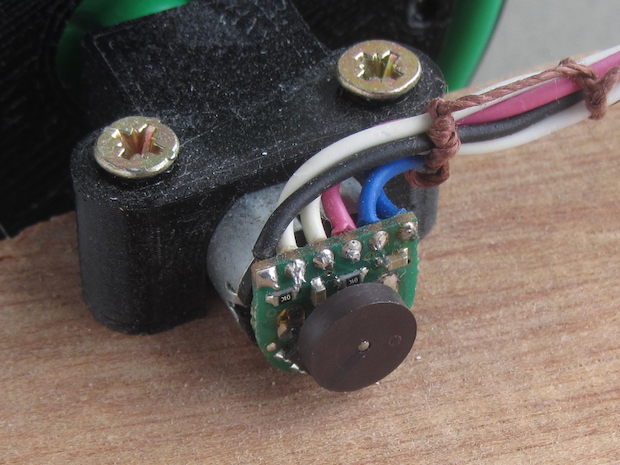
The Pololu Magnetic Encoder Kit comprises two parts. A sensor PCB mounts on the rear face of the motor. A 6 pole magnetic disc that fits onto the extended shaft of the motor. Here you can see a complete encoder assembly on the rear of a motor:
Operation
Hall Effect Sensors
Mounted on the PCB are two Infineon TLE4946-2K Hall Effect sensors (Datasheet). Hall effect sensors like these are designed to give a logic level output when they are near a magnetic field. The output is high (logic 1) for a North pole and low (logic 0) for a South pole. The outputs latch when they change. Once a North pole has set the output high, removing the magnet does not change the output. It will stay high until a South Pole is present when it will go low again.
Magnet disc
The sensors on the encoder are matched to a disc made of a magnetic material. The disc is magnetised so that it has six magnetic poles arranged radially around the disc like slices of a pie. There are three North poles and three South poles.

Encoder Board
The Hall effect sensors on the encoder circuit boards are 90 degrees apart. When one sensor is over one of the poles of the magnetic disc, the other detects a change of pole.

Output signals
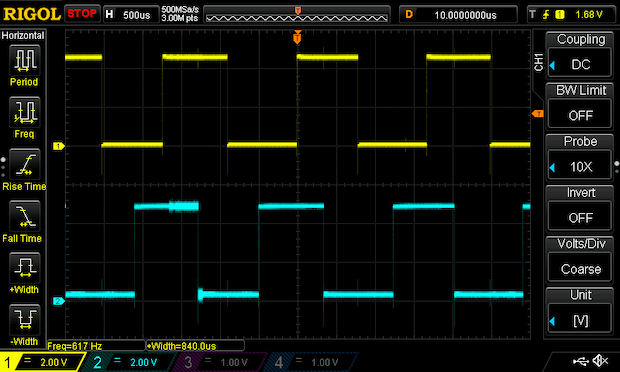
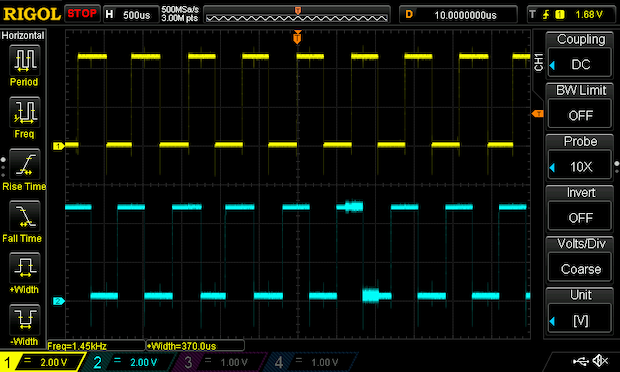
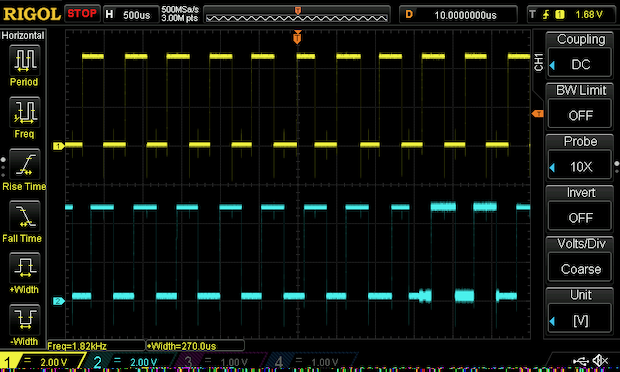
When the disc turns, the two sensors change state as the magnetic poles move past. High for a North pole, low for a South pole. Because of the careful placement of the sensors, the two signals overlap in a clear pattern. Here, Channel A is yellow and channel B is blue. Notice that the two signals never change at the same time.

By examining the sequence of signal levels A and B, a microcontroller can work out how fast the motor is turning and the direction in which it is turning. With six magnets, there will be twelve changes in the combined signals as the motor makes one complete rotation. If only one of the channels is examined, you can only detect six changes per rotation. Also, there would be no way to know what direction the motor was turning.
More Magnets
The magnet discs from Pololu have only six poles and so only allow twelve counts per rotation (cpr). If there are more poles, then you can detect more changes and the resolution of the encoder increases. It should be clear that there must be an even number of poles so that there are changes from North to South and back. A bit more thought reveals that not all combinations will work with the sensors placed at 90 degrees. In fact, the only possibilities are 2, 6, 10, 14, 18,. . . magnets.
To get greater resolution, you will need more magnets but Pololu only sell discs with six poles. A search online turns up tiny Neodymium magnets that are only 1mm diameter and 1mm long. They are also not too expensive in quantity. So, how do you actually make a magnet disc for the encoder?
New Magnet Disc
To place additional magnets, you need to make a disc to hold them. These tiny magnets are very powerful can be fiddly to mount. The most obvious solution is to make holes in a circular pattern through some suitable material. The gear motors are only 10mm high across their flat faces. Any disc placed on the motor shaft will need to be less than 9mm diameter so that it runs freely. The disc must be thick enough to mount onto the shaft and stay at right angles to the shaft axis.
Common materials are likely to be available in thicknesses of 1.25mm (mount board), 1.6mm (PCB, acrylic, ply, balsa), 2mm (MDF, acrylic, ply, balsa) and 3mm (acrylic, ply, balsa). More than 3mm will be too thick because the rear shaft of the motor is not very long. Soft materials will grip the shaft better than hard ones but are more likely to work loose over time. For my discs, I chose 2mm thick MDF as a compromise between the two extremes. The motor shaft is 1mm diameter, the same as the magnets.
Making the discs
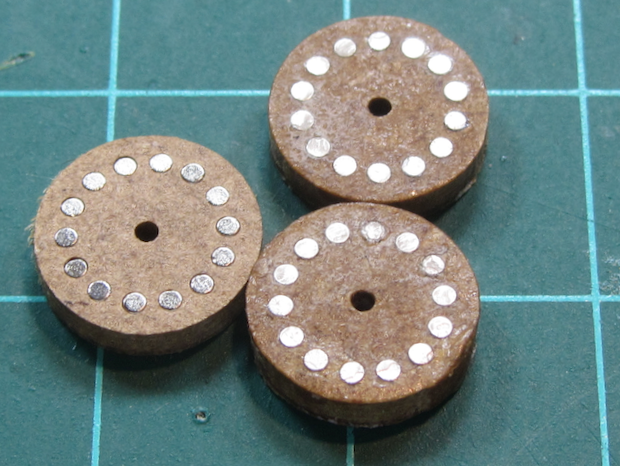
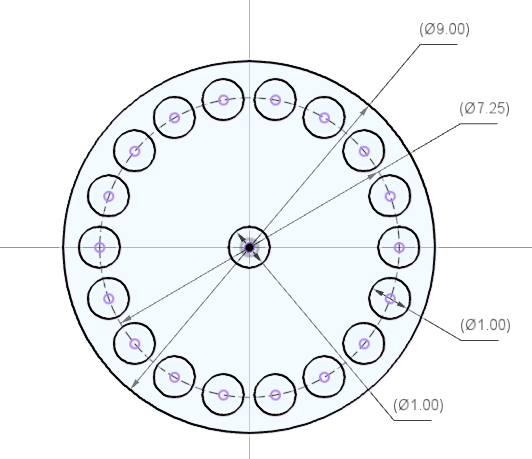
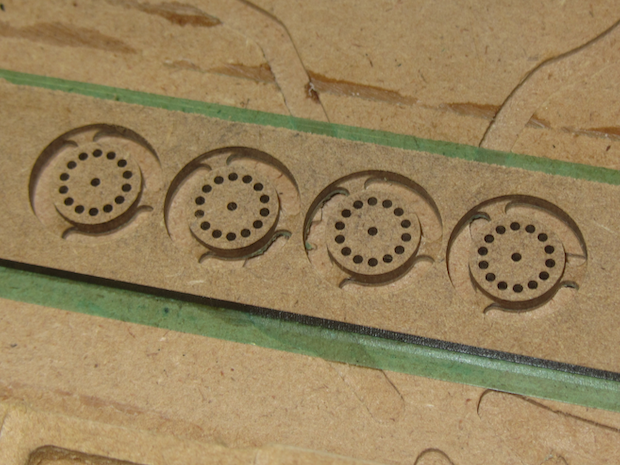
My MDF discs are 9mm diameter and the thickness is 2mm. All the holes, for the magnets and shaft alike are 1mm diameter. The question is, how many magnets holes can be made? Six will easily fit – that is the same number of poles that the Pololu discs have but the whole point is to increase the number of poles. The holes cannot be too close to each other, or too close to the edge of the disc or they will be harder to make and more likely to break through.
Suppose then that the magnet holes lie on a 7.25mm diameter circle. That has a circumference of 22.78mm. To try and fit 22 holes around that circle would be crazy. Easier is 18 holes at 1mm diameter which allows 0.26mm between holes. Not much but, enough if you have access to suitable equipment. A slightly safer bet is to make 14 holes on a slightly smaller 7mm circle, giving 0.57mm between adjacent holes.
Manufacture
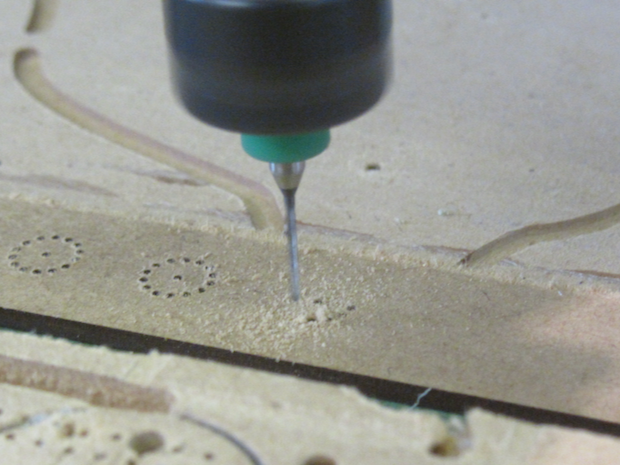
Because I own a CNC milling machine, that is what I used to make my discs. Two other methods are available for making discs. More people might have access to a laser cutter so that is probably the fastest and easiest solution if you make your own discs. 3D printing might work but getting reliable holes is always difficult.
A separate post [—-LINK—-] by Stephen Pithouse describes how he made encoder discs using a very inexpensive 40W Ebay laser cutter in a variety of materials. Another option might be to have discs made using PCB material. A batch run from places like JLCPCB could produce a large number of discs for very little money. In his post [—-LINK—-], Garry Bulmer will give more information about using PCB for discs once the first batch are ready.
CNC
For CNC, I modelled in Fusion 360 and post-processed to create instructions for the CNC machine.

I drill the holes first and then mill the outside with a 2mm endmill. For efficiency, I can batch the work for several discs in one session. For my first tests, I made four at a time.
Assembly
Placing the magnets in the discs will need good light, patience and some version of the cunning tool invented by Stephen Pithouse. He mounts a single magnet onto the end of a wooden toothpick using superglue and a short length of heat shrink tubing to hold it in place. I used a spare 1.5mm drill bit and two magnets for my insertion tool
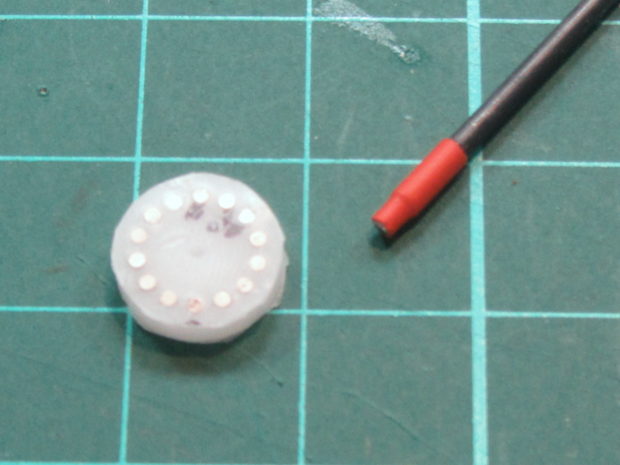
As supplied, the magnets naturally try to align themselves into a long stick and so they all have the poles pointing in the same direction. Use the mounting tool to help separate one magnet from the end of the stick and push it into the holes. Every time you take a magnet from the stack and attach it to the tool, it will have the same pole alignment. Because the poles of the magnets must alternate around the disc, I find it easiest to use just one tool and insert every other magnet.
After I place the first set of magnets, I flip the disc over and fill in the blanks from the other side. Now I know that the magnets have alternating polarity. If you prefer, you could use a double-ended tool or two tools with opposite polarity and insert the magnets all from one side. You might find it easiest to work on or near a metallic surface so that dropped magnets don’t stray too far. On the other hand, if the magnets are a loose fit, they may just pop right out. Experiment a bit until you get the hang of things. It should not take too long.
Glue the magnets in
After you insert all the magnets, use a non-magnetic tool – a cocktail stick is ideal – and make sure that all the magnets are flush with one surface of the discs. If any of the magnets are undersize or the holes oversize, the magnets will want to jump out and attach themselves to something surprising. To avoid that, I use a thin CA glue to hold them in place. Flood the holes from the opposite face and make sure it penetrates all the way down to the magnet. Runny glue, such as the Bostik Super Glue Easy Flow, works best. If you have a sensitivity to CA glue, nail varnish works very well as an alternative and is probably prettier to look at. No robot builders toolkit is complete without nail varnish.
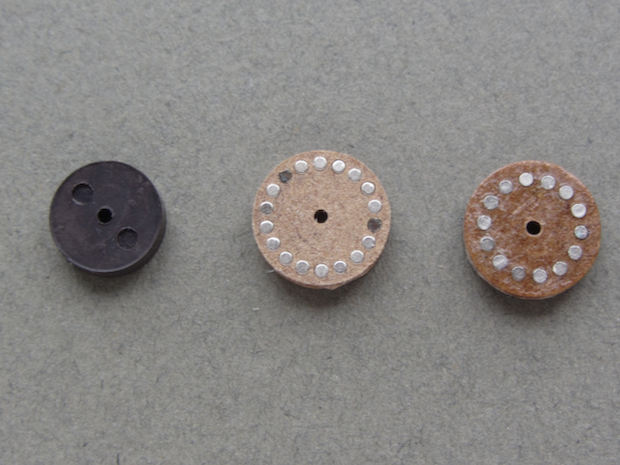
If you have some magnet viewing film, make sure that all the magnets are properly positioned and aligned, then glue them permanently. Here are three different magnets arrangements: the Pololu original, an 18 pole disc, an 14 pole disc, and the patterns they produce.
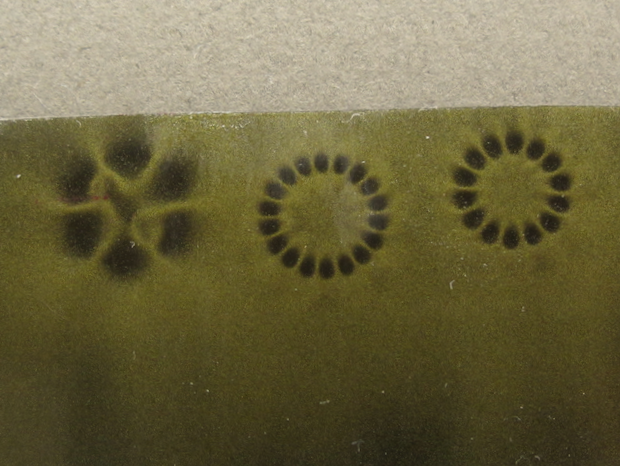
If you do not see a nice even pattern like this, you have a magnet misplaced. Pop it out and try again. Assuming you have not already glued it in 🙁
Results
Testing the magnet discs is very easy because they just push onto the motor shaft in place of the Pololu originals. Make sure that the face that has the magnets at the surface is closest to the sensors on the Pololu sensor board. Also, make sure the new disc runs true and does not rub anywhere.
Here are three oscilloscope traces showing the same motor and sensor, running at the same voltage but with 6 pole, 14 pole and 18 pole discs. The pulses are perfectly in quadrature and are clean and clear. The increase in frequency of the pulses and, therefore, the increase in resolution is readily apparent.
Conclusion
It is reasonably easy to increase the resolution of the standard Pololu magnetic encoders. Magnets are easy to find and cheap. The only catch is making the discs. Although I have a CNC milling machine to make this easy, a laser cutter would be quicker. If you do not own a laser cutter, it is likely that a nearby school or makerspace will have one. UKMARS may be able to make discs available soon – you would only need to cover the cost of materials and postage.
Look for a post by Stephen Pithouse for details of a laser-cut version, his insertion tool and video of the manufacture and assembly.
Garry Bulmer is working on an improved sensor board that should make it possible to make a complete replacement for the Pololu encoder and substantially reduced cost.
References
You can find out more about quadrature encoder signals in this Designspark article and this Sparkfun datasheet.
Magnets are available from AliExpress, Amazon and Ebay. You should search for “1×1 magnet”. Pay attention, don’t buy 1″by 1″ by mistake.
Magnetic field film is a little harder to find. Search for “magnet paper” or “magnetic field viewer”. You should find suppliers on Ebay and Amazon as well as specialist suppliers like First4Magnets. here is a result form Amazon so that you know what to look for. https://www.amazon.co.uk/Magnet-Expert-Small-Field-Paper/dp/B003N1LZ84